Monday, April 16, 2012

Scribd for Embedding PDFs

Another request I had, which I've neglected to get round to a little (sorry about that), was to investigate a widget or programme that could host PDFs on your blog.

Scribd.com is the programme for the task.

To use scribd, you simply log in using your Facebook account, or you can create a separate login if you want students to use it too. Next you upload your PDF file (it also claims to accept some other formats, though I have not yet tried). Once the file is uploaded you can adjust the settings to allow or not allow downloads, and to adjust the privacy settings. Remember though, it needs to be public or your blog readers may not be able to see it. You can, however, set it so that they have to come to the image directly and that will stop it turning up randomly in a search.


To add it to your site you can link or embed it into your blog by copying the code it gives (buttons on the left above) into your blog post.

Linking, will mean the file name will show in your blog as a hyperlink (blue underlined text) and your readers will be redirected to view your file on the actual scribd website. To do this, copy the link code, given by Scribd, into the link option on your blog.

I prefer to embed, as in the example below, as this allows the reader to view the document without leaving your blog.

Some important settings to consider are;
1) Downloadability:- You can set whether the readers can download the work or not. In the last post I allowed downloads as my aim was to share the file. However, in the example below I will share some of the children's work. I'm not so keen to share that so I'll turn off (or disallow) the download function in edit settings to the right of my scribd screen (as shown above).
2) Language Settings:- In the settings, you can tell the site what language your document is in. This helps browsers, such as Google Chrome, get their language management correct. There is nothing more annoying than your browser offering to translate something to english from some random language all the time. Getting this setting right reduces the annoyance factor for your reader. Scribd doesn't tend to guess right on it's own.
3) I've also just realised that by removing the title in the settings, you can stop Scribd adding a link above the embedded document. To see what I mean with this, compare the example below with the example on the previous post. You will see that there is no extra hypertext title on the example below. I personally like that because it's tidier. If I want to introduce the document I'll use formatting that matches my blog. Like this....

Why Use Scribd?

I find Scribd useful as a way to share kids real work. I can scan it and share it without having to get them to publish it. I can also share work that they publish by hand, which gives the kids a real audience and purpose for their handwork as well as their computer publishing. I intend to use this increasingly as the year goes on.

In the example below, we were talking about God's work and how God is diligent and wants us to be diligent too. We talked about the 7 days of creation and realised that on the 7th day, God rested. We realised that resting is just as important as working because it refreshes us for the tasks ahead. The kids remembered that we are created in God's image so we figured that God probably made us to enjoy relaxing in ways that he also enjoyed. Thus, on the 7th day, we drew God relaxing and enjoying our favourite relaxing activities. I got a particular giggle out of my gorgeous creative darling who drew God (a man) dressing up in a pretty dress complete with high heels, hairy arms & legs, and a beard! I think we had some real fun with this lesson.

Here is the example;

Sunday, April 15, 2012

Flashcards Recreated.

I had a few request for the original version of my flashcards which I introduced in an earlier post. Unfortunately the original document was saved on a back up which failed. But since they seemed to be popular, and I intend to make more in the future, I've recreated them. You should be able to download them in PDF form from Scribd. If you can't, let me know. Most of the images were sourced through FreePik. I highly recommend printing them out, cutting them up and pasting them onto coloured card before laminating them. It makes them stronger and more durable and stops the images being visible through the card giving unintended hints to the reader.
Below are the sounds cards I've already created and here is an editable template you can use to create your own sound cards. Do share with the rest of us too. I'll update you with any new ones I make and if you send me yours I may be able to include a guest spot or two.Sounds Flashcards (PDF)

Thursday, April 12, 2012

Metaphors & Learning Journeys

A few years ago, in my first year of teaching, I was fortunate enough to be involved in some PD around Inquiry Learning. The school I was at was embarking on the journey towards developing their own inquiry journey and, as part of the PD for it, they flew all the staff up to the North Island to tour some schools who were further down the track to developing an implementing their own inquiry process.

One thing I noticed on this trip was that Metaphors for learning seemed to be the next big thing. Whether it was a windmill, plane flight, tree or any other thing connected to the school, it was something the schools showed off with great pride. The kids really had taken it on board and it was a part of the school identity.

Some years later, I found myself involved in the creation of imagery for the metaphor of our school's values and vision. I haven't turned it into the inquiry & design processes yet but I will very happily. Still, just as I noted the schools I we visited were proud of there metaphors, we are very proud of our metaphor. It is very much our identity and is reflected in our logo and all other publications.

So, today, (after a long blogging absence for which I will apologise, explain and beg forgiveness for soon) ...

I present to you......

Tasman Bay Christian School's Pathway to Learning.


Wednesday, February 22, 2012

Greatest little Gaget I know

Want a listening post without the cost?

Want to claim back all that space taken up by those massive old listening posts you find in some classrooms?

This is what you need.
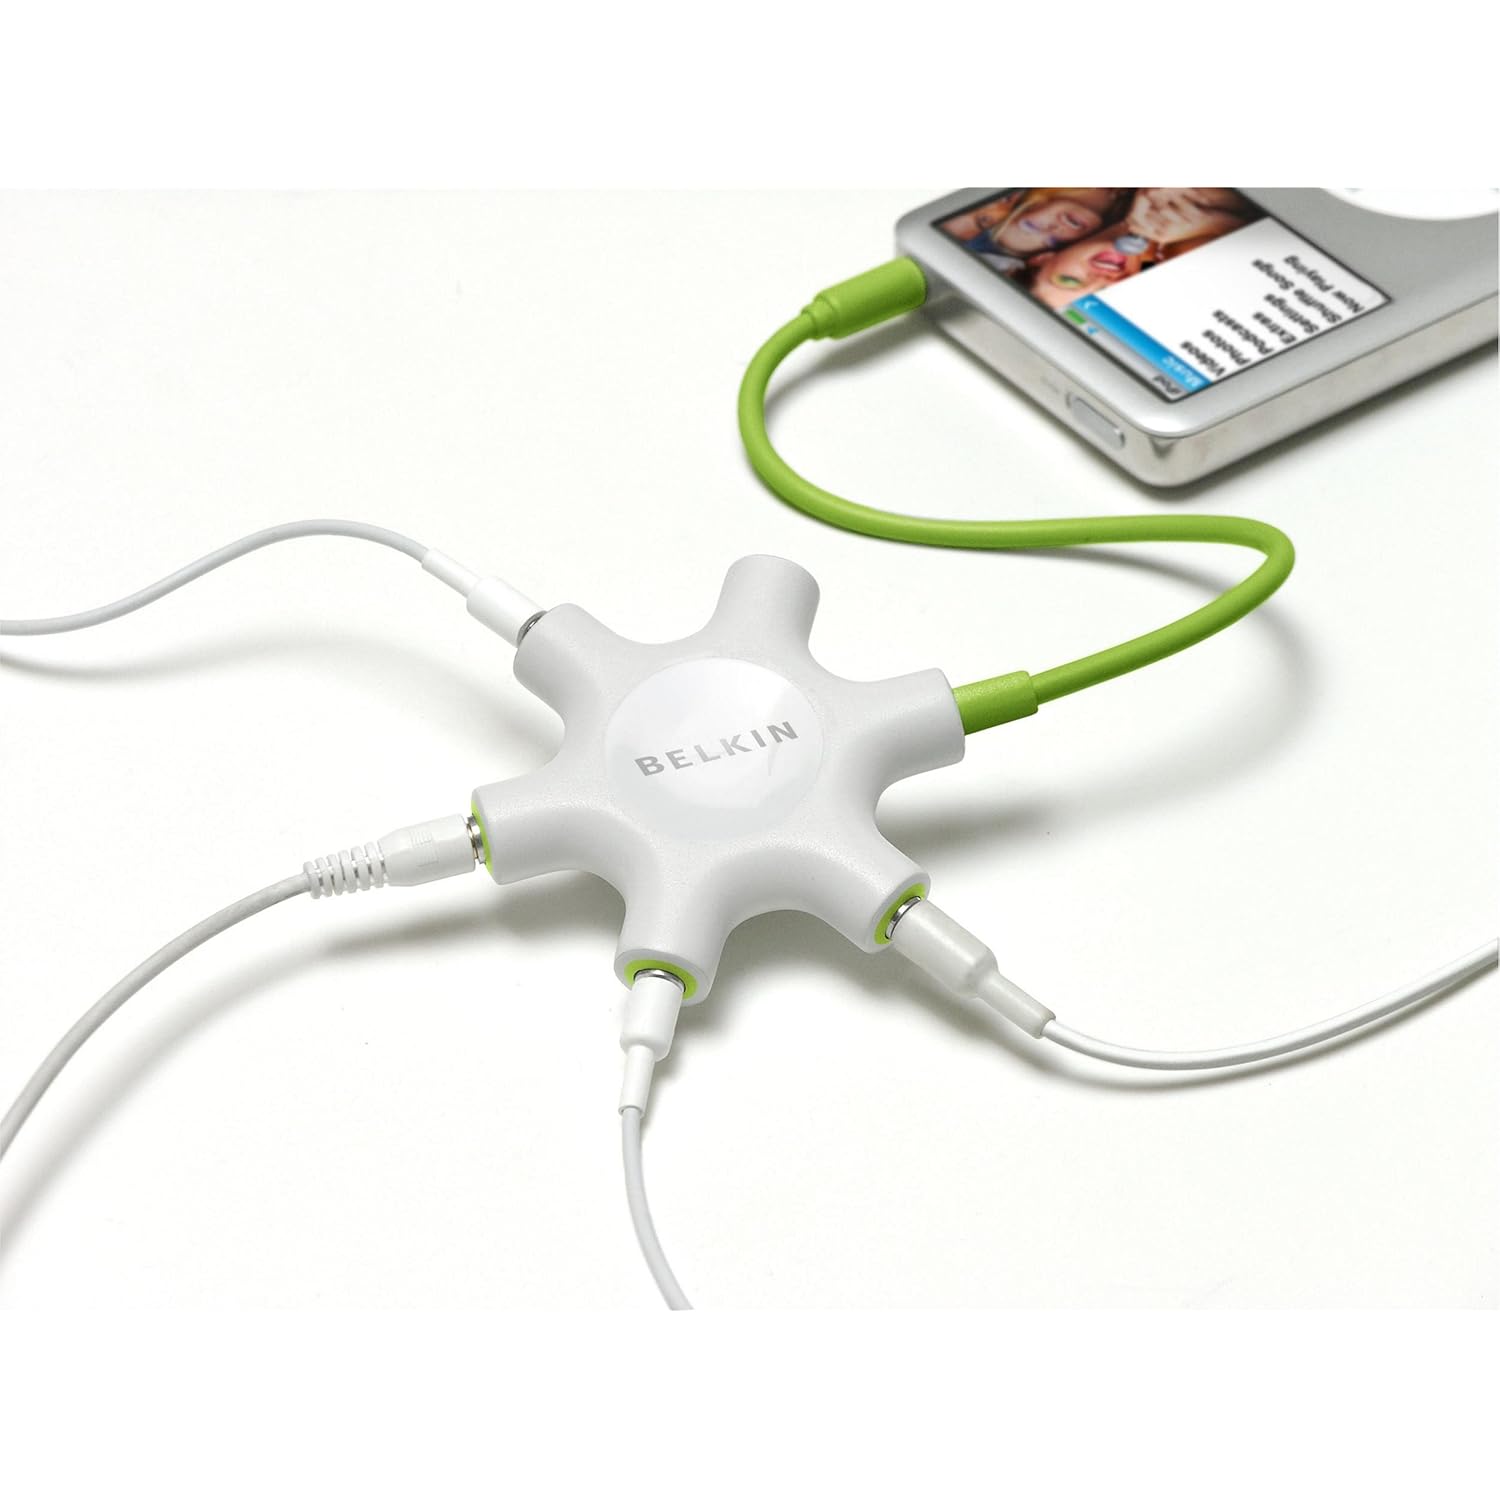
Belkin Rockstar Multi-Headphone Splitter

I highly recommend this little gadget.  - It produces a clear, quality sound and with no loss of volume. It's so easy to store and use. Just plug it into a computer, ipad or iphone and it allows a group of kids to work on the same computer or ipad activity at once. 

I also use it to work with students on Lexia. I can hear what they hear and work out where their confusion lies. 

Plus, of course, add an ipod and it becomes your own little listening post. Great for senior classrooms where you may want to utilize read and listen activities but don't have the space or resources to carry a full size listen post in every classroom.

This little gadget also has the ability to mix sounds from two or possibly three inputs. That's not something I've actually tried yet but the budding DJs in your class may like to have a go. Mix two ipods and feed the sound into garage band or other sound mixing software on a computer or ipad and come out with some really neat 'mash-ups'. Senior kids could have some real fun with that.

Better yet, it's actually quite cheep.

You can buy them online from Amazon UK (may require a UK delivery address) for about $13 per unit or from Amazon USA (ships internationally) for $15. You can access them from Harvey Norman in New Zealand but I was quoted around $30 so it's better to go online.

Enjoy.

Thursday, February 16, 2012

Organising my games

Today I finished something I began over the holidays. I organised my games.

I've been reading a wonderful blog called Clutter-free Classroom (thanks Jodi) which has kept me motivated in my quest to de-clutter my classroom. 

Clutter-Free Classroom

I launched the attack on my classroom over the Christmas period this year because I was determined not to go through another year without knowing what half the boxes in my office contained. That's a bi-product of taking over an existing classroom. The classroom wasn't really disorganized I just didn't know what was in all the boxes and stacks, something I'm sure most of you could related to at some point in your career. So I set out to find out, throw out and tidy up, in order to find a happy zen like state which worked for me. 

I found Jodi's blog around about the same time as I declared war and have enjoyed the little bits of advice and ideas she's shared. Plus, it's just been nice to know there are others out there fighting the same war on clutter. It's always nice to know you're not alone. I just wish I'd kept photos of the massive discard piles. I think she'd be proud of me. 

I'm not there yet, but I'm well on the way and today I finished tidying up my games. I thought some of these ideas might be helpful to others.

This year I am all about explicit WALTs (We Are Learning To). So I've gone through my games and put WALTs on them. I want the kids to take more responsibility for their learning and part of that is knowing WHY they are doing something. I think that knowing that there is a learning purpose will motivate them to play the games I put out rather than some easier ones they make up. 

In terms of reading, this is particularly important as my kids have an aversion to reading instructions. They would rather use dominoes for building purposes, than to read the simple instructions I give them for the real game (although that's a Maths game, but there are crossovers in all games.) 

Anyway, we are working on this, and I have a couple of sneaky ideas up my sleeve. I'll let you know how they go. One such ploy is to have the principal to wander through occasionally and ask them to show her what they are doing, how to do it and to tell her what they are learning through the activity they are doing. It makes them accountable and maintains my focus on making learning intentions explicit.


As well as the WALT (which I put on the bag and the game boards for maximum visability), I also include the contents of the bag and the number of players (if I want to restrict numbers). (See the last image for an example.)

Above is another WALT example and a cool way to prolong the life of your average plastic 'Guess Who?' game. The plastic holders were quite a mess (and bulky too) so I ditched them and got a friend to laminated the remaining small cards onto a coloured card background. (Thanks Mike.) When I've got some time, I plan to laminate the bigger yellow game cards too, to extend their life a bit more as well.  I then gave the kids tokens to cover the faces that didn't fit the information they had about their opponent's person (the yellow cards). 

Meanwhile, on the management side, in a recent Clutter-free Classroom blog post, Jodi shared Storage Tip #8 Ditch the Packaging. I've often used plastic bags when games have outlived their boxes, but it hadn't occurred to me to use them to save space as well. I like pretty boxes but I will definitely be ditching them when I need more space.

Here is my little tip of the week though. I learnt this from someone while I was training.

To extend the lifespan of zip-lock bags. Use thick tape to give extra strength at the seams then snip the corners off the bag. Once strengthened the bag is less like to rip (even at the corners) and the holes make it easy to get the air out of the bags once they are closed meaning less space wasted by balloon bags full of tiny resources and lots of air! I do this to all my bags. Another option is to hole punch the bag, just make sure you punch away from the edges of the bag and/or on a strengthened section.

Thursday, February 9, 2012

To Swim or Not To Swim, That is the Question

Another summer has rolled around and with it comes term one swimming.

My question this time was, do I swim with the kids or not?

I printed up the notices, requested parent help and secured the support of the bus drivers for lifeguard duty. Then I began eyeing the pool suspiciously. It's one thing to throw 22 complaining children into a cold pool and watch gleefully from the sidelines on a cold day, but to join them? Bravely, I decided I would.

Ok, so I may have left out the part about living in the sunshine capital of New Zealand, that the water wasn't actually cold at all and that it was a lovely warm day as well.

My real qualms were over the appropriateness of getting in the pool with my students. I know some schools say strictly, no teachers in the pool. I know for some schools it's a health and safety thing as you can't keep a proper eye on all the children if you are in the thick of it. But as I just rewrote the PE curriculum document I guess that call fell to me and I decided to go with the guidelines requiring an adult to supervise from above the pool (ie, not in it) at all times.

In terms of pedagogy and best practice, I look back to when I've taken classes to council pools for lessons with trained swimming instructors. It is only with the most able swimmers that the instructors are on the edge. The rest of the time the tutors are right in the water with the kids.

As teachers, we demonstrate reading, writing and maths as a matter of course. It seems a little strange that we don't do the same in swimming.

I think I'm more squeamish about dress codes actually. You spend so much time searching shops for nice looking outfits with high necklines and long hemlines, that it seems completely unnatural to jump into togs and dive into a pool with the students. But that's probably just me.

Board shorts and an extra singlet /swim top went someway towards settling those apprehensions, and confirming access to a separate changing room surmounted the final blockade.

So, on Tuesday this week, no excuses were left between me and that pool.

It was definitely rather entertaining to hear the excited yelps of "Miss Aldridge! Are you getting in? Hey! Guys! Miss Aldridge is getting in!" erupting around the pool. In fact, for a while there, we even had a small audience of students from the school whose pool we were borrowing. Funny.

It was also rather amusing when a lunchtime duty teacher remarked to the bus driver (to be found, at the time, relaxing in the shade at the water's edge) "Wow, you have them so well controlled, you barely have to do anything! I wish I could sit back and relax when I was teaching swimming." To which the bus driver gained great entertainment from pointing out that the teacher was actually IN the pool and he was "just the driver" (his words not mine). She looked quite surprised when one of the pigtailed "students" (me) turned round and waved at her. I have, however, since noticed that the instructors from the school before us in the pool today, were also swimming with their students. So perhaps it's more common than I realise.

And how did it work for teaching? Fabulously! 

Being able to demonstrate to the children in the water was so much easier. I think it takes a lot of spacial awareness to be able to turn something demonstrated vertically into an action they complete horizontally. It was much easier to demonstrate skills exactly as I wanted them to apply it. They picked it up so much quicker. Even John my Wednesday bus driver, who drove and supervised for us last year, noticed they were picking things up faster.

Being in the pool also allowed me to help kids physically. For example, one child was struggling to keep their arms straight because their kicking wasn't strong enough to maintain movement. I was able to pull him across the pool while he concentrated on breathing and arm strokes. I was able to help another student float his arms while he focused on his body and kicking.

I think the greatest benefit was with the non-swimmers and their increased confidence having me close by. Today I had a child, who previously would start crying almost at the sight of the water (and did so when I assessed them from outside the pool on day one), grinning, playing and gliding across the pool on her front, with her face in the water for prolonged periods of time. It doesn't sound like much but that was more in 2 sessions, than I achieved with her last time in the entire 5 week swimming program.

So in the end, the answer to the question? To swim or not to swim (with the kids)? 
The answer would have to be a resounding
Swim WITH them!!

Monday, February 6, 2012

Phonics Flash Cards

On a side note (from the last post), and in honor of my Mum's birthday, I thought another post about  the things my Mum has taught me was in order.

Mum tells me that she didn't try to teach my sister and I to read before school because she didn't want us to be bored. However, my sister began "reading" books at 4 months so clearly Mum's plan was not going to hold much weight with her. A strong memory of my sister and her reading skills is the annoying photographic memory she had/has. Staying in a cabin with my family during the christmas holidays, we would be in bunks on opposite sides of the room. I would ask Mum what a word in my book was and my clever sister would ask the sentence and proceed to tell me the not only the word I was struggling with but often the rest of the paragraph to boot! Grrr. Stupid intelligent sister.

I was never as fast a reader as my sister or my clever cousin, both of whom can devour a large book in one sitting, but I did have very good understanding. I probably didn't realise that until my reading tutor at Grad School (New Zealand Graduate School of Education) pointed out to me all the comprehension strategies I was using, both as the cause of, and as a remedy to, my slow reading speed. As a result, comprehension strategies are central to my reading tuition. I might blog about my programme at some stage.

Looking back, I don't really remember learning to read at school, but I do remember Mum teaching me phonics. It's a strategy I myself use daily now, and one I think was out of vogue when I in school.

I still remember Mum's little cardboard flashcards in the cupboard with the games and jigsaws. "ow as in cow" "ough as in tough". I jazzed those up last year and used them for a struggling student in my class. He went on to improve from reading level orange to level 2 texts (with support), over two years of progress in one year. Unsurprisingly he took out our school's 'Most Improved' trophy for the year and the movement definitely started when I introduced the cards. Go Mum!


I was so impressed with how well they worked. I was going to share the template but unfortunately my back-up disk failed. They are easy enough to make though. I just printed up squares and stuck them on to coloured card. That served two purposes; it stopped the cards being see through and it removed the hassle of making them match up perfectly with double sided printing.

I just made up cards for letter sound combinations he struggled with. I picked images that helped him recognise the sound and clue word. It worked great because if he couldn't remember the sound he remembered the picture and the word and that gave him the sound. Sometimes I had to get a little creative in my images. e.g. for "ould" I used the cover of "The Little Engine That Could" and I read him the story to help him remember and recognise the image.

He learnt them really quickly. Try it with your kids. I'd love to know how they respond.

Anyway, it just goes to show. Your Mum really is your first and best teacher. Thanks Mum.
Happy Birthday!